Enhance your videos effortlessly with just a few slider adjustments using our online video enhancer.
Online Video Enhancer
If your video turned out too dark, too bright, or needs more contrast, or if you want to add effects and transitions for a higher quality look, our online video enhancer is the perfect tool. The great thing about it is its powerful features, and there's no need for installation. Just click 'Get Started' and you're ready to elevate your video with a few simple clicks and tweaks.
Powerful Video Quality Enhancer
Aimages is equipped with features that allow you to significantly improve your video. Adjust basic elements like Brightness, Saturation, Contrast, and Hue. For deeper enhancement, you can even tweak Gamma values with our video quality enhancer.
Improve Video Quality Online
Avoid the frustration of lengthy downloads and installations with Aimages. Our tool is straightforward and ready to use directly on our website, ensuring you can start enhancing your video's quality immediately.
Enhance Video with Filters
In addition to color adjustment options, our video enhancer includes a variety of Filters. These can be applied to your video with just a click, perfect for achieving a specific feel without the hassle of fiddling with sliders and settings.
Free Online Video Enhancer
Our video enhancer is free, allowing you to experiment and see its effectiveness without any financial commitment. There's no need to create an account – simply click 'Get Started' or 'Choose Video', and you're all set to transform your video.
Getting started: Start enhancing your videos in less than 3 minutes
Video Enhancer, a product of Aimages, is tailored to significantly improve the quality of your videos. Recognizing the diverse factors that influence video quality, we've crafted Video Enhancer to address the elements most crucial to users, including:
- Upgrading resolution, for instance, from SD to HD.
- Eliminating video compression artifacts.
- Minimizing blur in your footage.
- Reducing ISO and other forms of noise.
- Enhancing the video framerate.
- Generating natural and fluid slow-motion videos.
These features are designed to meet the most common enhancement needs, ensuring your videos not only look better but also feel more professional.
Uploading Files
To begin, first open the Aimages web application. Then, navigate to and select 'Video Enhancer' followed by the 'Uploaded' menu item on the right.

In this section, you can upload your videos. Simply click on the 'Click to select video' button to choose and upload a video file of your preference.

Once you select a video, it will begin uploading immediately.
The duration of the upload is contingent on the speed provided by your Internet service. For a smooth experience, we recommend an upload speed of at least 4 Mbit/s, with 10 Mbit/s or higher being optimal.
Choosing Options
Once the upload completes, the app will navigate to a new page where you can select AI Filters and explore other available options.
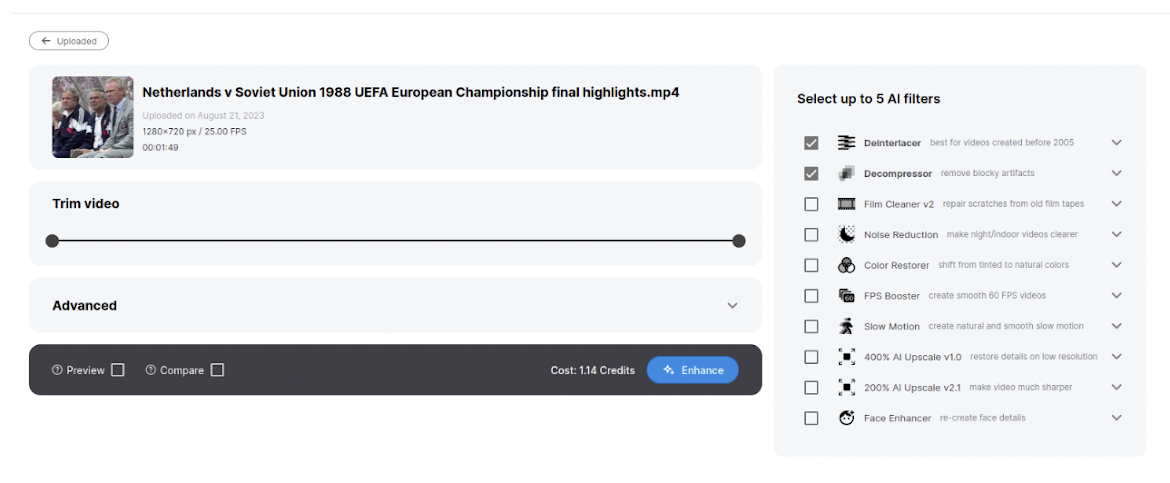
AI Filters are the heart of the Video Enhancer, with each filter designed to address a specific video quality issue. For instance, the 200% AI Upscale filter is crafted to double the resolution of your video while enhancing details. If you're dealing with low-resolution footage, this filter is an ideal choice!
By clicking on the small dropdown arrow icon next to each filter, you can access more detailed information about the filter, along with a visual example to illustrate its effect.

To proceed, determine which AI filters are needed for your video. For example, if your video has low resolution and noticeable noise, choose the 200% AI Upscale and Noise Reduction filters.
While there are additional options on this page, we'll stick to the basics for now. You can explore these further in other articles in the Help Center. Once you've made your selections, simply click on the 'Enhance' button and watch as the transformation takes place.
Processing
The challenging part is now over; all that's left is to wait for your video to finish processing. You can track the progress by clicking on the 'Processing' tab located in the sidebar on the left. Remember, this tab will only be visible if there are videos currently being processed.

AI video processing is a task that requires significant computational power. We continuously strive to enhance processing speeds; however, longer videos or those with higher resolutions may still take some time to process. We appreciate your patience during this phase.
There's no need to keep the Aimages webpage open while your videos are being processed. Feel free to take a break, go for a walk, enjoy a cup of tea or coffee, or browse through TikTok or Instagram...
Once the processing is complete, we'll send you an email notification, so you'll know right away that your video is ready for download.
Downloading the enhanced video
To access your enhanced videos, simply open the Aimages app and navigate to the 'Enhanced' tab in the left side menu.
Here, you'll find all your enhanced videos. You can either download them by clicking the 'Download' button or preview them directly in your browser. And just like that, your video is now enhanced!

Advanced Settings:
You may have observed an 'Advanced' section while selecting AI filters for your video. This section can be expanded by clicking on the dropdown arrow icon located on the right.

Resize to a specific resolution
This option might seem similar to AI filters like the 200% and 400% upscale filters, which also increase resolution, but there's a key difference. While AI filters use sophisticated AI algorithms for resolution enhancement, the 'Resize to a Specific Resolution' setting employs standard non-AI resizing algorithms commonly found in video editing software, such as bilinear and bicubic methods.
This feature is particularly useful when you need to adjust your video to a specific standardized resolution. For instance, imagine you have a video with a resolution of 600x337 pixels. Using the 200% AI upscale filter, the resolution becomes 1200x674 pixels. However, if your goal is to have the video in the standard 720p format (1280x720 pixels), the AI upscale alone won't suffice.
Instead of manually adjusting the resolution in a video editor, which can be time-consuming, you can simply select the 720p option in the 'Resize to Specific Resolution' menu. This will automatically resize your video to the desired 1280x720 pixel resolution, saving you time and effort.
Non-AI resizing always maintains the original aspect ratio of your video, so there's no risk of it becoming distorted or stretched. For instance, if you upload a video with a resolution of 1280x500 (which has an aspect ratio of 2.56) and choose to resize it by 2x while selecting the Full HD (1080p) option, the resulting output will be 1920 x 750 pixels. This ensures that the aspect ratio is preserved.
What NOT to do
It might be tempting to think, “I can increase my video resolution even beyond what the upscale filter offers with this setting.
However, we advise against doing this. While you might end up with a video that has 4K resolution, it won't be a true 4K video in terms of detail quality. Real 4K videos contain a level of detail that simply upscaling with non-AI algorithms can't replicate.
Resizing using non-AI methods often results in videos that are blurry, lacking in detail, and have excessively large file sizes (a 4K video could be about 4 times larger than its HD counterpart).
In summary, you should use this setting only to adjust your video to a specific resolution format that is similar to the resolution achieved through AI upscaling.
Film grain
Film grain refers to the small, buzzing pattern that contributes to the classic 'film look' in movies. An example of this can be seen in the movie 'Casablanca'.

The grain is distinctly visible on the shirt and face in older movies shot with analog film cameras. This is because the graininess typically originates from the film tape used in filming.
Generally, it's advisable to either disable this setting or adjust it to low or medium levels, based on personal preference or that of your viewers. If you're aiming for that classic 'film look', incorporating film grain can effectively achieve this aesthetic.
For professional video editors experienced in post-processing, we recommend disabling this setting. You can always add film grain later using your preferred video editing software, which offers more precise control over the grain's intensity.
Video codec
A video codec, simply referred to as 'codec', is a sophisticated algorithm that strikes a balance between video quality and file size, technically known as the compression rate. A more efficient codec will yield a smaller file size for the same level of video quality.
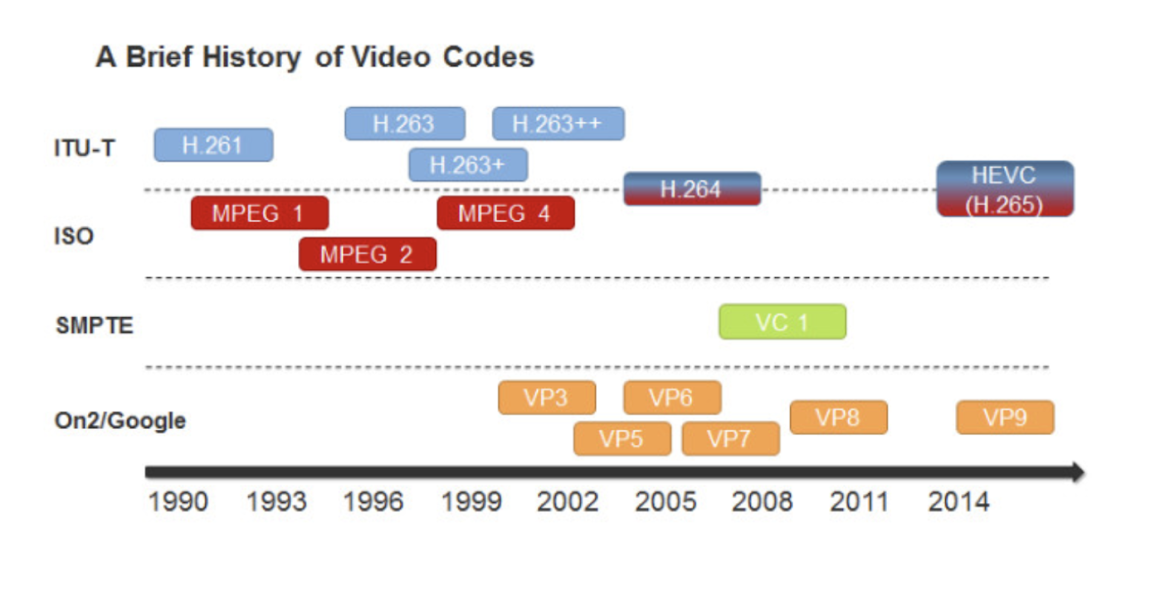
Numerous video codecs are in use today, with the H264 codec being one of the most popular. It's widely utilized across various platforms, including social media sites like YouTube, TikTok, and Instagram, as well as in messaging applications like WhatsApp and Telegram, among others.
If you're uncertain about which codec to choose, H264 is a safe bet. It's almost universally supported and provides high video quality while maintaining a relatively small file size.
For those interested in delving deeper into video codecs and containers, we recommend watching this informative video.
Encoding quality
The encoding quality setting determines the level of video compression in the enhanced video. Each video codec offers options for adjusting this level of compression, and altering this setting will modify the degree to which your video is compressed.
The encoding quality effectively alters the video's bitrate, which is an underlying technical aspect. A higher bitrate generally means better quality. Bitrate is typically measured in kilobits per second (kb/s), and you can check the bitrate of a video in most video players.
Simply put, this setting adjusts the balance between Quality and File Size. The higher you set it, the better the video quality, but this also results in a larger file size.
For most users, the 'High' setting should suffice. It provides good quality without a noticeable dropoff, except perhaps to a video editing expert, and keeps the file size relatively small.
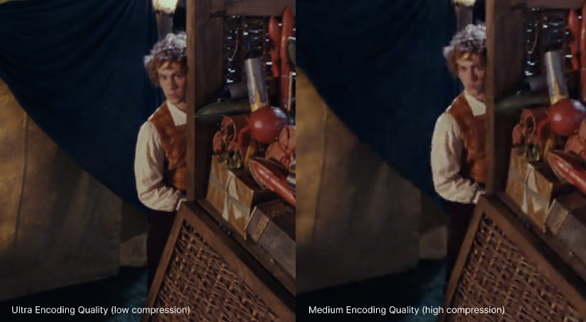
If your priority is to minimize the file size of your video, opt for the 'Medium' setting. Conversely, if your focus is solely on achieving the highest possible quality, select the 'Lossless' option.
Output video extension
Professional video editors often refer to video extensions as video containers. You've likely encountered some of the more popular containers, such as:
- mp4
- mkv
- mov
- avi
- wmv
- mpg
- webm
Contrary to common misconceptions, the choice of container doesn’t significantly impact video quality; it's more about compatibility and support. It's crucial to understand that specific video codecs need to be paired with compatible containers. For instance, you can't use the WMV container with the Apple Prores codec.
In essence, it's best to choose a widely supported container, ensuring compatibility with various video players and websites. Typically, .mp4, .webm, or .mov are the most universally supported formats, in that order.
Free Previews: Learn how to get free previews for your videos
When you begin the video enhancement process in Aimages, choosing the 'Preview' checkbox activates the Free Preview mode. Once selected, you'll notice that the cost of the enhancement is marked as 'Free', indicating that no Credits will be charged for this particular enhancement.
The Free Preview mode is an excellent option for quickly assessing the output of your enhancement without the need to spend any Credits.
Free Previews are exclusively available to users subscribed to the Standard, Pro, and Elite plans.
Limitations
Free Preview mode offers a glimpse into the enhancement process but comes with certain limitations:
Video Length Limitation
Only a brief segment of the video will be enhanced in Free Preview mode. The duration of this sample is determined by your subscription plan. For specific details, please refer to our pricing page.
Watermark Inclusion
Videos enhanced in Free Preview mode will feature a Aimages watermark in the bottom right corner.
Resolution Limit
The maximum resolution for Free Previews varies based on your subscription plan. For instance, under the Free subscription package, Free Previews are limited to videos with resolutions up to 1280x720 px. Visit our pricing page for detailed information about resolution limits for each subscription package.
Trimming in Free Preview Mode
When using the Free Preview mode, the 'Trim video' functionality is available. However, the end trim mark will automatically adjust to align with the maximum Free Preview duration of your specific subscription package.
Troubleshooting: Learn how to solve most common issues with the Video Enhancer
In this section, we outline the most common issues encountered with the Video Enhancer feature, along with solutions to address these problems.
Color Banding
Color banding, also known as posterization, is a visual artifact common in digital images. It typically appears in gradients between two similar colors, where you see distinct, abrupt transitions instead of a smooth, fading gradient.
Color banding is often seen in gradient backgrounds of digital renderings or in photographs, with natural gradients like skies being particularly prone to this issue.
The image provided below showcases an excellent example of color banding, where the sky clearly displays these abrupt color transitions.

To Resolve Banding Issues
We suggest using the highest possible Encoding quality setting, ideally 'Lossless', to prevent banding. If file size is a concern, you might also consider the 'Ultra' setting.
You can find the encoding quality dropdown in the 'Advanced' section on the AI filter selection page. This adjustment should help mitigate any banding issues in your images.

Troubleshooting Enhanced Video Playback Issues:
There are two primary reasons why your enhanced video might not play:
1. Missing Decoder Codecs:
For your video player to play enhanced videos, it needs specific decoder codecs. If these codecs are missing, the video won't play.
The solution varies depending on your video player. You'll need to install codecs for H264 and H265 formats. Since installing codecs can be complex, we recommend using a video player that already supports these codecs. One such player is VLC (Video Lan Player), which is free and compatible with these codecs.
2. Insufficient Computer Power:
Although rare today, older computers and phones might struggle to play high-resolution videos, such as those in 4K.
If you're using an older device, the issue might be due to the resolution of the enhanced video. High-resolution playback can be demanding for less powerful devices. To address this, consider reducing the output resolution of your enhanced videos.

You can adjust this in the 'Advanced Section' by selecting a lower 'Resize' setting. Opting for Full HD [1080p] can balance good quality with easier playback, as it's significantly lower in resolution than 4K.
Additionally, you have the option to use other video editing software to lower the resolution of your video even after enhancing it with Aimages. We recommend Handbrake as it is both free and user-friendly.